Are you looking to gain an edge in SEO? If your image optimization isn’t up to snuff, you could be missing out on traffic, user engagement, and sales.
Google looks at more than 200 factors when deciding which website to rank for a specific search query. While having a well-optimized image won’t help sub-par content rank number one, it can help you stand out from other sites that don’t optimize their images.
The good news? Image optimization isn’t particularly complicated. Just a few changes to your current image process could help your site gain more traffic and leads, resulting in more sales.
Why Is Image Optimization Important?
Well-optimized images get better visibility in Google, which brings in more traffic. That’s the number one reason sites need to optimize their images, but there are many other benefits as well:
- Improve the user experience: Well-optimized images that display correctly improve UX by making your site easier to navigate. Large images, for example, can take up the entire screen or cover other elements on the page.
- Faster site speed: When it comes to SEO, speed matters. Images that are large or formatted incorrectly can slow down your site, killing your ranking and annoying site visitors.
- Makes your site more accessible: Some optimization steps, like adding alt tags, can make your site easier to navigate for those using screen readers. Web accessibility is not only good for site visitors; it’s good for SEO, too.
While image optimization might feel like another step in a never-ending quest to improve SEO, it can have a significant impact on ranking and UX.
How do you make sure images aren’t holding your site back?
7 Image Optimization Tips for Your Website
Technical SEO can get pretty complicated, especially if you aren’t familiar with the latest Google algorithm updates and what they mean. The good news is image optimization isn’t as complicated as other aspects of SEO—and it doesn’t seem to change quite as often.
Ready to make sure your images help your SEO? Here’s what you need to know.
1. Choose the Right Image File Type
Using the wrong image file type can cause your images to be displayed incorrectly, look blurry, even impact whether users can see your images. But there’s a ton of different formats for images—vectors, JPEGs, raster, PNG, GIFs.
Which image type is best for SEO? Generally, you’ll want to use either JPEGs or PNGs.
JPEG, aka Joint Photographics Expert Group, is a popular image file type. They can be displayed by just about any type of device and can show millions of colors, so they preserve the coloring of your images well. JPEGs do use lossy compression, resulting in some lost data during compression, so they’re not ideal for professional photography. However, they work fine for featured images in blog posts, and similar images.
Another popular type of image is PNG, which can also be displayed on any type of device. These use lossless compression, which means they don’t lose data during the compression process. They also support elements like transparent backgrounds. However, the file sizes tend to be much larger.
These are the most popular images for web publications. Here’s when I recommend using them:
- Use JPEGs for blog post images, screenshots, etc. The smaller size will protect site speed, and most images will be clear enough. If the quality isn’t good enough and your site speed is good, feel free to switch to PNG format.
- Use PNGs for icons, logos, and images where someone might zoom in. PNGs are larger but slightly higher-quality images. When image quality matters, use a PNG file.
I strongly recommend against using other image formats on your site, especially GIFs. I love a good GIF, but they really do slow your site down.
2. Compress Your Images
Image compression takes large image files and makes them smaller so they’re easier to load on the internet or store on your device. Image compression strikes the perfect balance between size and image quality when done well.
The two types of image compression are lossy and lossless compression. Lossy compression, which JPEGs use, essentially throws out some of the data while lossless preserves all the data. (PNGs use lossless, as I mentioned above.)
Therefore, the type of compression you use depends on the image type you select.
Here’s an example of compressed images:

The image to the far left is 824KB, which is quite large. The middle image looks virtually identical (there’s a little graininess in the background if you look carefully) but is far smaller at 76KB. The third one is even smaller, but image quality is definitely impacted.
Aim to strike the right balance between size and quality.
When deciding how much to compress your images, think about your user. In most cases, they are unlikely to care whether an image on a blog post is a tiny bit less crisp. However, if you are sending a client a new logo, that’s a different story.
The point is, use the compression type based on the file format you use and select the file format based on how the image will be used.
Now, how do you compress images? There are several tools.
I like resizing.app, it’s a free Chrome extension that lets you convert file formats, crop, and resize images in just one click. Other photo compression tools include Photoshop and PicResize.
3. Add Description Alt Text
Alt text (aka, alternative text) is a written description of an image that describes what it is and what purpose it serves. Screen readers use this data to describe images to their users, and Google uses it to determine whether an image is relevant to a search query.
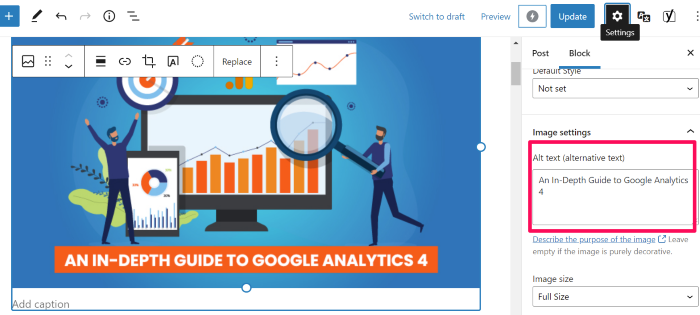
If you use WordPress, adding alt text is very simple. Just highlight the block with an image and add the alt text to the provided box, like this:

In Google Docs, right-click on images, then click Alt text, and a box will appear that allows you to add the alt text.
What do you write as your alt text? While it’s up to you, here’s the formula I use:
“Main keyword – description of image”
For the image above from WordPress, I used “image optimization guide alt text in the WordPress example.” This format makes sure screen readers know what the image is and tells Google the image is relevant for image optimization search queries.
Pro tip—if you want to see how your competitors use alt tags, navigate to their site, right-click and select “Inspect.” You’ll see the alt tags in the code of their site.
4. Write High-Quality Image Names and Descriptions
Image title provides users (and search engines) with a little more context about your images. While they don’t impact ranking directly (according to Google’s John Mu), they do provide a bit more context, and they show up in your site code.
I recommend using a short phrase that describes the image, along with the key term the post targets—similar to your alt text.
This can also make your images easier to find in Google image search since Google generates a title and snippet for images. If you include a title, they’ll take that into consideration.
5. Ensure Images Are Mobile-Friendly
If you’ve used the correct file type and compressed your images, they should be pretty mobile-friendly. However, sometimes things don’t always display the way we expect.
More than half of all internet traffic comes from a mobile device, so you want to ensure images don’t mess up the mobile experience.
For that reason, I recommend viewing your site from several different mobile devices to ensure images look their best. Remember, tablets, iPhones, and Android devices may all display your images a little differently.
I also recommend using Google’s mobile-friendly test to make sure your images aren’t slowing down site speed on mobile.
6. Use Schema Markup
Schema markup, also called structured data, is a type of code that helps search engines better understand your data.
Imagine you want to collect recipes to make a book of family recipes. Rather than having everyone send in their favorite recipe—which might use different measurements, different title formats, etc.—you send out a form and ask your family to input their recipe.
Now, all the recipes are in the same format and you can easily view the ingredients, measurements, and cooking steps.
Essentially, that’s what schema makeup does. It formats your data so Google can understand if it’s a list, a recipe, an image, and so forth. Here’s what it looks like:

Schema.org lists three types of image schemas, including:
- layoutImage (pending implementation)
- logo
- photo
This is a more technical change, so don’t stress if this feels like too much. Schema.org lists the coding you can use to add structured data to images here.
If you need more help, feel free to reach out to my team; we can help you get this set up.
7. Optimize Image File Names
According to Google, it uses the URL path and the file name to understand your images better. This means you should organize your image URLs logically and include key terms in the file name.
This can help you stay organized and help Google understand your images: a double win.
File names don’t have to be complicated. I usually use the alt text as the file name, which makes it easier to upload posts to WordPress.
I recommend using the keyword in the file name and describing the image.
Frequently Asked Questions About Image Optimization
What does image optimization mean?
Image optimization means making sure both Google and users can easily understand and view the images on a website. Examples include compressing images so they load faster and adding alt text so Google can better understand what the image is about.
Why is image optimization important?
While image optimization isn’t the most important SEO tactic out there, it can help you stand out in the competitive online world. You’ll still need high-quality content and to follow other SEO best practices, but image optimization is another way to increase your Google ranking.
What is the best image format for SEO?
There’s no specific format that is better for SEO. In general, you want images as small as possible while preserving as much data as possible. I recommend PNG if it doesn’t slow your site down too much.
How does image SEO work?
Image SEO works by making your images easier for Google to understand and making them as useful as possible to your site visitors. For example, adding alt text helps Google understand what your image is about and makes it easier for screen reader users to navigate your site.
Conclusion: Image Optimization
Google gives us a lot of information about how to optimize our sites and our images. It’s easy to get overwhelmed by all the small details.
The tips above will help you make the most of your images; however, I recommend focusing on making sure your images bring value to users. Don’t cram images in just to meet a quota, and don’t add images that don’t make sense for your content.
Have you optimized images on your website? How did it impact your traffic?
from Blog – Neil Patel https://ift.tt/3tizVS7

No comments:
Post a Comment